
Congratulations on your Pronestor Workspace solution! This guide will take you through the Administration module, and how you can configure the solution and get it ready for use.
Getting access
Please follow the following steps to access the solution and the Administration module:
You’re now in the Administration part of the solution and can start the configuration.
We recommend connecting your Pronestor Workspace solution to your AD straight away, to import users and get single-sign-on.
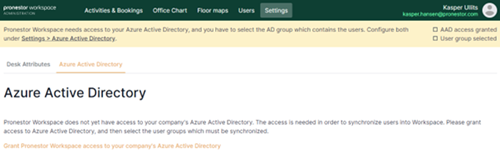
Select Settings in the top menu and then select Azure Active Directory.
Single-sign-on: must be activated by connecting your Azure AD.
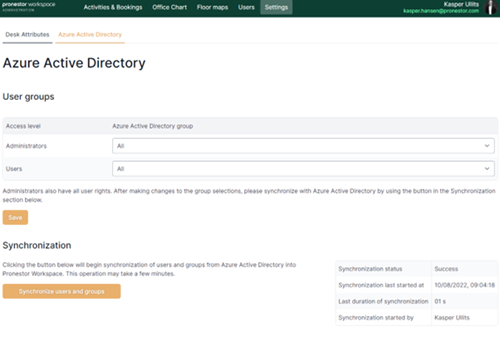
Your users will now be automatically maintained from your AD.
After activating Single-sign-on, we recommend creating the attributes for desks, as you will need them later.
Attributes: are the different types of equipment or other relevant information about a desk, that can be used to find a desk with the proper equipment. To create the attributes, you must have an overview of all the different types of equipment/information that are available on all the different desks.
You have just created your first attribute and can continue with the rest on your list. The attributes will be added to the list above “Add a new attribute”. If you need to change or delete an attribute, simply select it from the list of attributes and you can edit it. You will also be shown which desks this attribute has been added to.
Creating your location and units
You can now proceed to create your different locations, units and areas. Before you start, please consider the best structure for your office/locations. When creating your locations and units, consider how many floors you have, how large they are and if they have a natural split into smaller sections. E.g., based on departments or the geographical orientation of the location. This can make it easier for users to navigate, and it will also impact the floor maps you create for the solution. Please scroll down to see the section regarding floor maps.
To do this, please follow these steps:
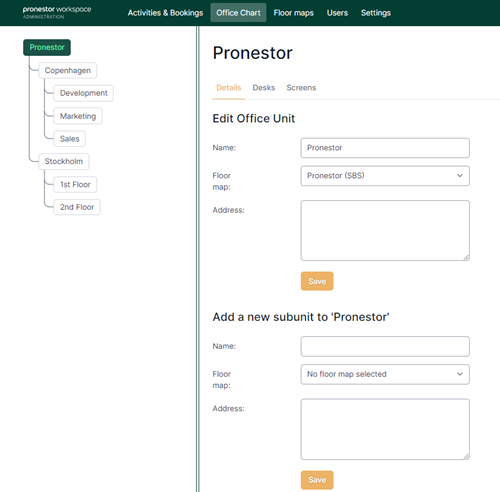
Now you can proceed to add all the units/subunits you need. Please note that you can create as many units as you want below you main unit, as well as add subunits to subunits. Just select the relevant subunit on the left side and you can now add a subunit to the subunit.
In this screen dump, you can see that Pronestor is the main unit. With offices in 2 different cities, we have added those as subunits to the main unit. In both cities, we have chosen to divide the offices into different areas, to help users find their way. These areas are added as subunits to the subunits.
Once your different locations and areas has been created, you’re ready to add desks to each. Please be aware, that desks should always be added to the lowest levels, to ensure best searchability in the user interface: :
Your first desk has been created – you can now proceed and add all desks in the different areas. Should you need to edit a desk, simply select it in the list below. When editing a desk, you have several options:
If the desk has been mapped to a floor map, you can see which floor maps.
By having floor maps in the solution, it’s usually much easier for the users to locate desks and find their way around.
Recommendation
Based on our experience, we have the following recommendations for different setups:
To get floor maps in the solution, please go to this guide to see how to get the files ready as well as the options for icons etc.
The floor maps will be created in the right format by the Pronestor Support team and sent back to you.
Important tip! If you have 1 floor map covering an entire floor and other floor maps covering smaller sections of that same floor, you should just map the floor map for the entire floor. This mapping will then be reflected in the smaller floor maps as well.
Once you have received the floor maps, please follow these steps to map them:
*Tip! When you have marked a desk and chosen the proper desk in the drop-down, you can simply mark the next desk and enter the first letter of the desk on your keyboard. You will now see it in the drop-down and select Enter to select it.
Continue until you have mapped all desks and the select “Save”.
You can now proceed to upload additional floor maps and map them. Once you have completed this, you need to connect the floor maps to the different units in the Office chart:
Continue until you have chosen the floor maps for all relevant units.
When you have added floor maps, they are visible in the solution. However, it’s also possible to show a floor map on a large screen mounted at the entrance to a building or floor. This can be a help for users when they arrive at the location and need to find their way around.
To connect a screen, please follow these steps:
The screen will now show the floor map you have just chosen. If relevant, it’s possible to add several screens to one unit.
If you need to edit the content on the screen, e.g., update the floor map, simply select the right screen. You can now update the name, which unit it’s connected to or change the floor map. The screen will automatically update once you have selected Save.
You have now completed the configuration of tur Pronestor Workspace solution. To see the full solution and test it, select your profile at the top. You will now be taken back to the solution and can check your configuration.
Should you need inspiration for the test, please check the User guide and perform different bookings. This will help you validate that the solution is configured as expected.